
iThemes Security is an extremely effective security plugin for WordPress, but sometimes it can block the users you want accessing your site from logging in. In this post I’ll show you how to make take steps towards preventing this frustrating scenario from happening.
Want us to handle this for you?
If you’d rather not deal with technical settings or risk breaking something, our team can take care of it quickly and safely.
Local Brute Force Settings
One of the main methods hackers use to gain entry to your site is by attempting to log into your site en masse, also know as a Brute Force attack. iThemes prevents this sort of breach by limiting the number of login attemps a user has before initiating a cool-down period where they’re temporarily blocked from logging in to your site. By default iThemes limits users to 5 failed attempts before blocking a user for 5 minutes.
One way to solve this issue is by increasing the number of failed attempts within iThemes’ settings. After logging into your site click “Settings” under the “Security” link on the left side of the WordPress admin panel. From there you’ll go to “Configure” then “Lockouts” and you can either increase or decrease the number of attempts in the “Max Login Attempts Per Host” field. This setting limits the number of failed attempts before blocking a user’s IP address.
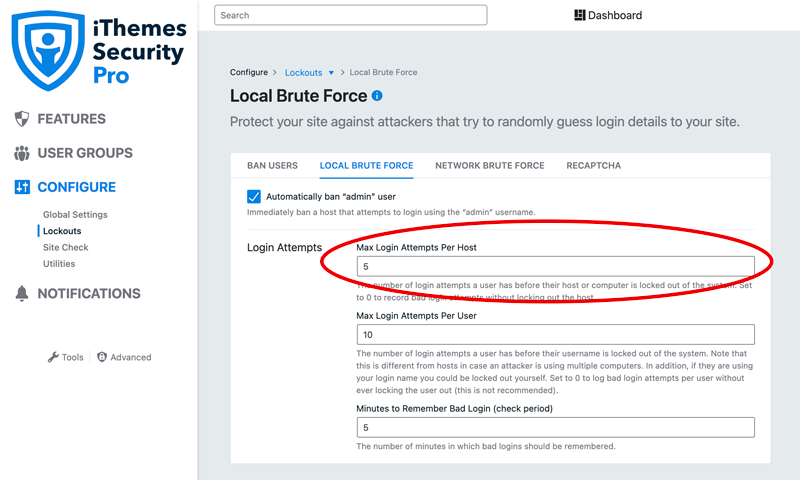
After adjusting the value you’ll need to click the “Save” button at the bottom right corner of the screen and your updated settings will take effect. Be aware, by increasing the number of login attempts you’re not only increasing it for your trusted users but for potential hackers and other bad actors.
The next setting you can adjust on the Local Brute Force page is “Max Login Attempts Per User” which limits the amount of failed login attempts for a specific username regardless of the device or IP address. This will protect you in the event that you’re under attack by a brute force attack but the IP address is changing to get by the previous host lockout. Leaving this at the default setting is fine, but if you’re noticing a lot of failed login attempts across different hosts you can decrease the attempts.
The final setting you can adjust is the “Minutes to Remember Bad Login” field which sets the time period for which a ban will occur if too many failed attempts are made. By default this is set to 5 minutes so with the current settings a user will have their IP banned temporarily when they have 5 failed login attempts within a 5 minute period.
iThemes Security Dashboard
You can monitor the status of lockouts, brute force attacks, banned IPs, as well as other security stats by visiting the iThemes Security Dashboard by clicking the “Dashboard” link under the “Security” menu item.
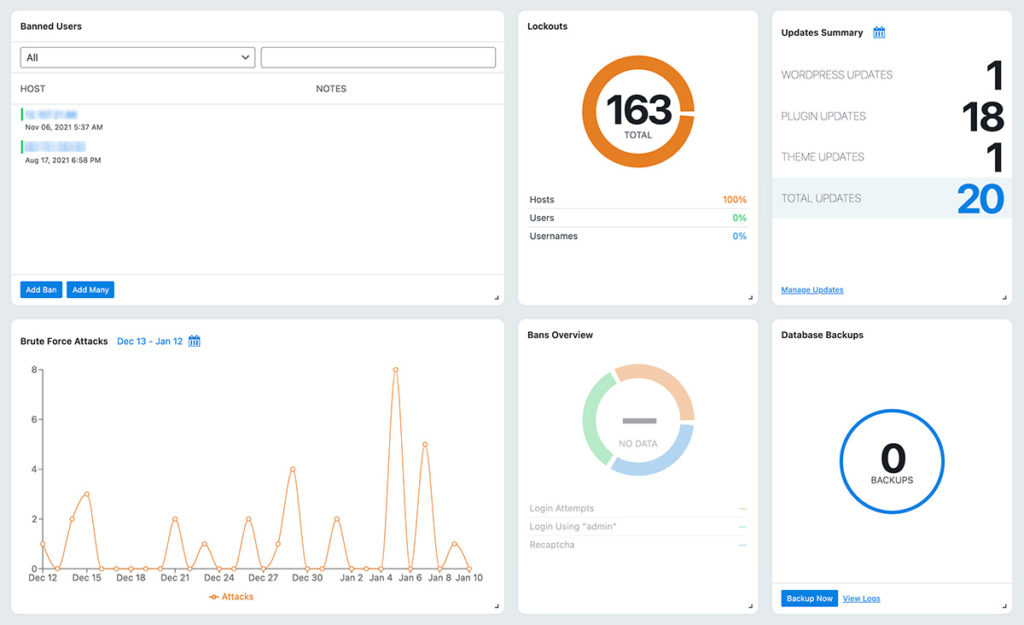
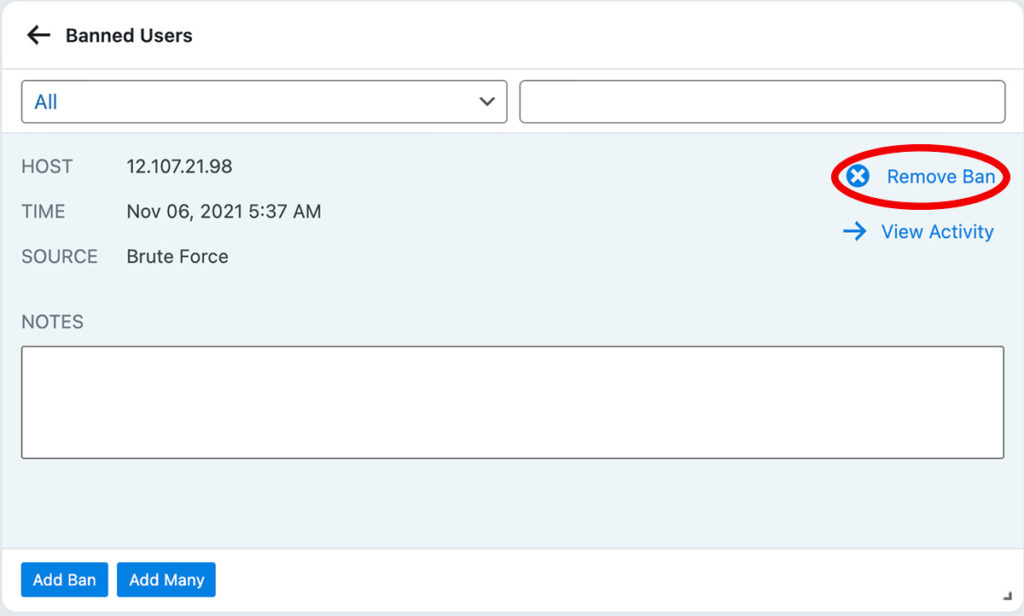
As you can see in the screenshot above there are currently two banned hosts in the Banned Users section and 163 total lockouts. If you’ve received a complaint from a user about being banned you can manually remove the ban. To remove a ban you’ll click the IP address of the user you want to unban and then click the “Remove Ban” link.
Rather have this handled for you?
If you’d rather not deal with settings, permissions, or technical details, our team can take care of this quickly and safely.
- Correct setup and permissions
- Secure configuration (no password sharing)
- Clean documentation and handoff
Global Settings
In addition to the Local Brute Force settings you can also adjust the length of time a user will be banned, the length of time lockouts will be remembered, ban threshold, and customize the error message that is triggered when a host is locked out. To access the additional lockout settings you’ll click “Settings” under the “Security” menu item, then click “Configure” and “Global Settings”.
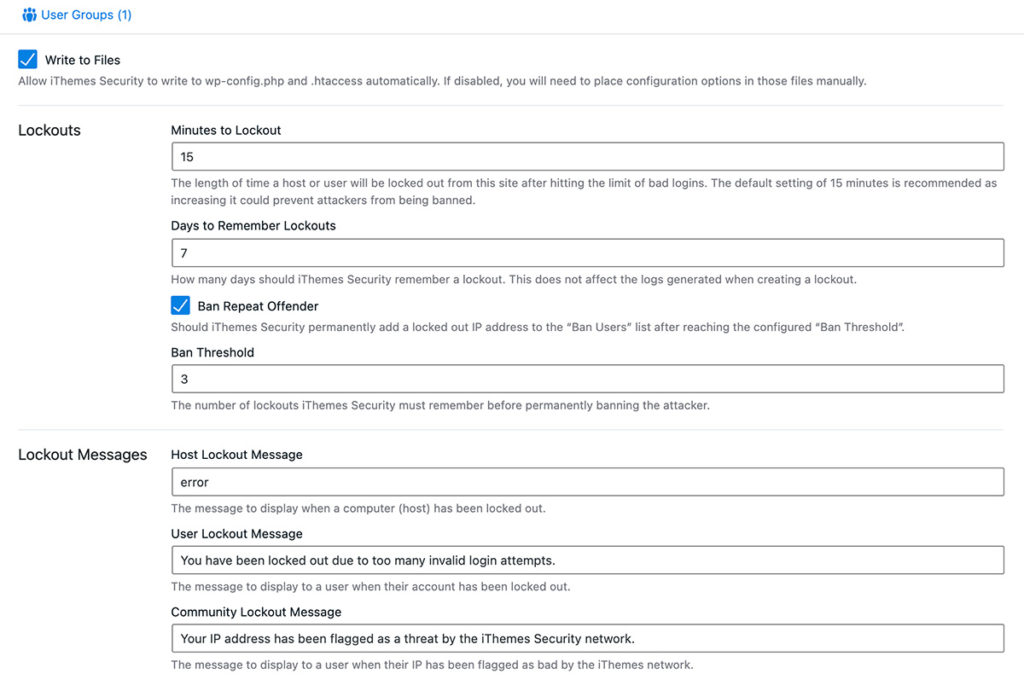
On this screen you can adjust the “Minutes to Lockout” which determines the length of time users are locked out from logging into your site. “Days to Remember Lockouts” controls the window of time that lockouts are remembered which correlates to the next two settings “Ban Repeat Offender” and “Ban Threshold”. By default “Ban Repeat Offender” is checked and users will be permanently banned if they are locked out a total of times equal to the value in the “Ban Threshold” field over the period of time in the “Days to Remember Lockouts” field. In the case of the screenshot above users will be banned for 15 minutes and then if they are locked out 3 times over the course of 7 days then they’ll be permanently banned.
The other thing you can adjust is the error message that users see when they’re locked out. Generally, we leave these settings at their default values but if you’d like to provide additional feedback to users you can do so by editing the “User Lockout Message” field. After making any adjustments to the settings on this page you’ll have to scroll down to the bottom and click the “Save” button.
Use your best judgment when adjusting the parameters for user lockouts to find a balance between a positive user experience and a secure website.
Need help with this or anything else?
If you’d rather not deal with ongoing updates, settings, or technical issues, our team can handle fixes, support, and long-term maintenance for you.
Bonus Tip for s2Member Users
If your website uses s2Member for membership functionality then you have additional options for adjusting log-in security and you can find them here.